Gerrit Niezen

electronics

I just received a WCH CH32V307 RISC-V development board as part of the Hack It! RISC-V Design Challenge. What follows is a simple tutorial in getting started with running an RT-Thread example on the CH32V307 development board.

Installing and setting up the IDE

Setting up the debugger

  • Go to Run –> Debug Configurations..
  • Select GDB OpenOCD WCH Debugging / rt-thread.elf
  • Click on the Debugger tab
  • Enter the following under Config options: -f wch-riscv.cfg
  • Click Apply and then Debug

Setting up debug options in MounRiver Studio

Running the example

  • Plug your development board into USB port P9
  • Make sure the project is selected in the left-hand pane
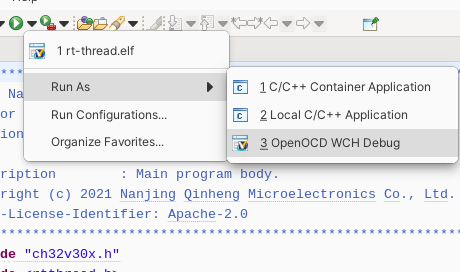
  • Click the arrow to the right of the Run button, and select Run As –> OpenOCD WCH Debug:

Screenshot of Run As

If all goes well, it should build and and start running the example. If not, you may need to click Project-> Rebuild. Now, open up rt-thread/user/main.c in the project, and you'll see that it is supposed to flash an LED and print to the terminal. Now you may wonder: “Why am I not seeing LED1 flashing on the board?” I wondered this too, and found this in the CH32V307 evaluation board manual:

  1. LED: Controlled by connecting the extension connector J3 to the IO port of the master MCU

What this actually means is that you need a jumper cable to connect pin LED1, which is on the extension connector J3, to pin PA0, which is on both the extension connector and the Arduino interface. If you wire this up correctly, you'll hopefully see the LED blinking:

Blinking LED on CH32V307 dev board

If you also want to see the RT-Thread terminal, just connect to the board using your favourite serial terminal at 115200 bps, e.g. using minicom:

minicom -b 115200 -D /dev/ttyACM0

RT-Thread terminal in minicom

You don't need a separate USB-serial adapter, as the serial interface is provided by the WC-Link onboard the development board.

Any feedback and comments are appreciated!

#riscv #wch #electronics #ch32v307 #rtthread

Discuss...

What are your favourite tools when building hardware?

Multimeter

If you're working with electronics, you need to be able to measure voltages, current, resistance and continuity. I mostly use a $10 multimeter to check if voltages are at the right levels and if there's continuity between various parts of the circuit. You'll notice there's no oscilloscope on this list. If you're only working with digital electronics, an oscilloscope feels like an unnecessary luxury. Most of what you need to figure out can be done with a multimeter and a logic analyser.

Logic analyser

My $10 logic analyser from eBay only measures up to 24MHz, but I've been able to successfully decode USB traffic that typically would be done with a USB analyser costing 50 times as much. The open-source Sigrok PulseView software supports a wide range of protocols for decoding, and is surprisingly easy to use.

Digital calipers

If you have a 3D printer, you're going to find digital calipers useful. It makes it so much easier to measure the dimensions of enclosures, components and circuit boards. I bought a super-cheap plastic digital caliper for $7, and so far it's been working just fine. I find myself using it so often that I could easily spend a little bit more on one that allows for finer adjustments.

USB-to-TTL converter

If there's any kind of UART serial communication between your microcontroller and peripherals, a $5 USB-to-TTL converter is a very useful addition to your toolbox.

Software-defined radio

This may sound like an unusual addition to this list, but being able to use a $10 DVB-T USB stick as a software-defined radio is priceless if you're working on a wireless project. I've used mine to measure the length of pulses while building a circuit to communicate with a remote control socket, and to check that what I'm building is actually sending data over the air.

#electronics #OpenHardware

This weekend I spent some time figuring out how the Barcode Detection API in Chrome on Android works, and implemented a basic barcode scanning web app. I hope to integrate with some kind of food database, so that I can easily track what goes in and out of my pantry.

I also played around with the Circuit Playground Express I got for free with my Hackspace magazine subscription a while back, specifically using it as a colour sensor. I ordered some crocodile clips off eBay so that I can also play around with the soil moisture detection example.

I’m publishing this as part of 100 Days To Offload. You can join in yourself by visiting https://100daystooffload.com.

#100DaysToOffload #CPX #electronics

Feature image

I have owned this multi-meter for over ten years, always storing it in the cardboard box that it came in to keep the wires from getting tangled or losing the test leads. Today for the first time I noticed there are slots on the back for storing the test leads. It turns out with the right technique it's possible to neatly wrap the wires around the meter and then tuck the test leads into the slots. Nice!

#Electronics

Feature image

I've been enjoying a new e-mail newsletter by James Bowman of Excamera Labs. James is the creator behind awesome electronics projects like the Gameduino 2, a full colour touchscreen for Arduino.

He has a bunch of new projects at the moment, like the SPIDriver that let's you connect to SPI devices from your computer. And some of these projects he is building at home, as he explains in the latest edition of the newsletter:

For short-run through-hole PCB assembly, there's not much point in having these made abroad vs. making them yourself. Either way an 18-year-old with a soldering iron will be doing the work.

He pays his son $12 per hour for assembly and here is his argument on why it's a good thing:

It's also good just to get young people involved. Often when we're thinking of ways of introducing people to technology, we think of putting them in class. They already spend a lot of time in class! Much better to engage them in something practical and slightly unfamiliar. They seem to find it satisfying, and catching the inevitable failures gives them a hands-on insight into how things work.

I don't know what your high school work experiences were like, but I feel like maybe he's got a point. He goes on to explain how, due to Chinese manufacturers now selling directly online, getting electronic components doesn't have to be expensive. Buying 350 components of specific type would cost him $144 from a US distributor, while he could buy it directly from the Chinese manufacturer for $15.

In an earlier edition of the newsletter he describes how to make a “placement stencil” using a laser cutter, which makes it very easy to place components on a PCB by hand. Stencils for applying soldering past are also cheap nowadays, and you could get an IR reflow oven for a reasonable price as well.

In short, if you're making hundreds (instead of thousands) of something, it may just be easier and cheaper to do it yourself, even if said something is electronics.

#Electronics #Making

I still haven't successfully received data from the meter, but analysing the USB packets using the logic analyser that I started with yesterday has been super helpful.

After I discovered yesterday that there wasn't any USB bulk transfer data being sent on the bus, I had a look at the relevant code and it turns out that I didn't define two of the registers correctly. Once that was fixed I could successfully load data into the SNDFIFO register, put the number of bytes to be sent in the SNDBC register, and send it on its way. I verified using the logic analyser that my bulk transfer data was now appearing on the USB bus.

Unfortunately, nothing is coming back yet. I figured that maybe I should try to sniff the packets between my WebUSB app and the cable, so I opened up my USB hub:

usbHub

After my initial surprise to discover that the PCB is purple[1], I connected the logic analyser the same way I did yesterday – straight to the USB connector.

And guess what? It worked great. I can see USB traffic between an app on my computer and a device connected to my USB hub, down to the bit-level. This means I can even sniff USB traffic on macOS El Capitan and Sierra, where Wireshark doesn't work. Now to figure out what is different between the WebUSB-to-device and Espruino-to-device communication.


  1. I've only ever seen purple PCBs from the awesome OSH Park ↩︎

#Electronics #Tidepool

Today I want look at analysing what exactly is happening on the USB bus when we send and receive messages, to make sure that what I think is happening is actually happening. On a Windows or Linux machine this can be done with Wireshark. I think it may also be possible on macOS since the High Sierra release. However, we're working with a USB host controller chip, so Wireshark is a no-go.

There are professional-grade USB analysers from Total Phase that start at around \$475 (for USB 2.0 full-speed 12MBps) all the way up to \$6000 (for USB 3.0 5Gbps). While we should be able to use the 12Mbps analyser, I wanted to see if it's possible to use a little $10 logic analyser to analyse USB traffic:

This little $10 logic analyzer arrived on Friday and I am looking forward on using it with the awesome open-source @sigrokproject software. It would be great if I can get it to sniff some low-speed USB traffic. pic.twitter.com/Awhb9pSzvm

— Gerrit Niezen (@gendor) October 2, 2017

That was almost ten months go, and since I'm still struggling to figure out why I'm not getting any results back from the meter, I decided to give it a try. This 8-channel 24MHz logic analyser was only £13.44 (including P&P). It comes with a set of test hook clips, which I was able to connect to the USB port surprisingly easy:

hooksusb

The pins at the back of the USB connector has just enough space so that you can attach the hook clips. The USB connector pinout is +5V, D-, D+ and GND, so I had another look at the schematic on the Sparkfun website. It showed that D+ and D- are connected to resistors, while +5V is connected to an overcurrent protection device. Based on this I could identify which side was +5V and connected the hook clips. I connected D- to channel 0 on the logic analyser and D+ to channel 1, and GND to ground. I also connected D2 to CH2 to use as a trigger:

logicSetup

Now it was time to install the sigrok PulseView software. I chose “fx2lafw” as the driver for my analyser, and when it successfully connected, defined the three channels for D-, D+ and the trigger. I selected the maximum available frequency (24 MHz) and 1 G samples, which should allow for 42 seconds of sample time. I then added the USB signalling decoder with USB packet and USB request decoding, and specified the appropriate signals and full-speed signalling:

sigrok1

I also added digitalWrite(D2, 1) in my code where I wanted the trigger to occur. I started up the Espruino code and clicked on Run:

firstSession

I was successfully sniffing USB packets between the TUSB3410 chip in the cable and my USB host controller chip! After verifying that most of the packets I was sending were actually appearing on the bus, I noticed that my bulk out transfers were missing:

missingPackets

Above you can hopefully make out the setup packet 40 05 00 00 03 00 0A 00, which should be followed by some data. Instead it is followed by the “close” packet 40 07 00 00 03 00 00 00. So maybe that is where I should start looking as to why things aren't working!

#Electronics #Tidepool

I spent a couple of hours this afternoon and again this evening trying to get the TUSB3410 driver to work. I am now able to successfully communicate with the TUSB3410 chip inside the USB cable, set up some configuration parameters and send data to the glucose meter connected to the cable. The final step, actually getting data back from the chip, is still not working.

Basically, I'm getting a 0x0D error back from the USB host controller chip which, according to the data sheet, is a “J-state instead of response” error. What this actually means is not explained anywhere in the documentation, but I did come across a blog post from 2010 that indicates it may be an issue with my “Set Configuration” control transfer message.

Part of my debugging process involved actually using the WebUSB driver I wrote inside the browser and then using Wireshark to sniff the USB packets on the bus. This way I was able to make sure that I'm sending the exact same bytes to the USB controller chip. However, on Linux and macOS it wasn't necessary to set the configuration, so I'm not sure why it's different now.

As a quick aside: To connect to the TUSB3410 chip via WebUSB on Linux, I first had to disable the built-in TUSB3410 kernel driver that claims the device when it's plugged in. To do this, you can type lsmod | grep 3410 to find the name of the kernel driver. On my machine it's ti_usb_3410_5052. To disable it, type sudo modprobe -r ti_usb_3410_5052. To re-enable it, type sudo modprobe ti_usb_3410_5052.

#Electronics #Tidepool

Today there won't be any new code, as I'm still trying to get it to work. After yesterday's successes in reading the device and configuration descriptors, I decided to implement a USB driver for the TUSB3410 chip from Texas Instruments (TI) on top of the USB stack I've written so far.

During my previous Tidepool hack week last year I wrote a WebUSB driver for the TI chip. This chip is used in the USB cables that communicate with the Abbott FreeStyle series of blood glucose meters, and there is no macOS USB driver available. Using WebUSB, I was able to successfully download data from a meter on macOS. Now I would like to see if I can get data from the meter using the Espruino and the USB host controller chip.

I'm writing the the USB stack for the controller chip so that it looks like the WebUSB interface. Therefore it should be pretty easy to re-use that driver code, as long as the USB stack underneath behaves the same as WebUSB.

While working on this today, I realised there are still a number of functions I need to implement in my USB stack, like control transfers that send data. When I get this to work and retrieve data from the meter successfully, I will put the code on GitHub and see if I can write an explainer here.

#Electronics #Tidepool

Feature image

Now that we can connect to a device using the USB controller chip with Espruino, we can start reading the USB configuration and device descriptors. These descriptors give us more information about the device, for example its USB vendor ID and product ID. We need to follow the following series of steps before we can start sending and receiving data:

  1. According to the USB spec we first need to wait 200ms after connecting to the device and then reset the device bus.
  2. We then wait until the device is reset and start the Start-Of-Frame (SOF) marker. This is a timing reference that is sent at 1 ms intervals at full speed.
  3. According to the USB spec we then need to wait 20 ms after the device is reset and check if the SOF marker was received.
setTimeout( () => {
  console.log('Resetting device bus');
  this.setRegister(REGISTERS.HCTL, HCTL.BUS_RESET);
  while((this.readRegister(REGISTERS.HCTL) & HCTL.BUS_RESET) !== 0) { }

  console.log('Start SOF');
  const result = this.readRegister(REGISTERS.MODE) | HCTL.SOFKAENAB;
  this.setRegister(REGISTERS.MODE, result);

  setTimeout( () => {
    if (this.readRegister(REGISTERS.IRQ) & IRQS.FRAME) {
      // first SOF received
      console.log('SOF received');

      // get descriptors here

    }
  }, 20); // USB spec says wait 20ms after reset
}, 200);

As soon as we have the first SOF marker, we can start reading the descriptors using a control transfer. To send and receive data, everything in USB land happens in terms of transfers, of which there are four types:

  • Control transfers — send a defined request to the device, for example to read information about a device or select configuration settings
  • Interrupt transfers — low latency data, for example keypresses or mouse movements; also the the only way for low-speed devices to send data
  • Bulk transfers — data where a delay can be tolerated, but the fastest way to send data if the bus is idle
  • Isochronous transfers — guaranteed delivery time, but no error correction, so useful for streaming audio and video

To do a control transfer, we need to set the address register and create an eight-byte setup packet containing the following:

  • The request type, i.e, 'vendor', 'standard' or 'class'
  • The request itself, for example 0x06 is USB_REQUEST_GET_DESCRIPTOR
  • A value field with two bytes containing request-specific information
  • A length field specifying the number of data bytes

In the following code example we also introduce two other functions. sendBytes(register, bytes) is used to send multiple bytes, which we place into the USB chip's SUDFIFO register. After that dispatchPacket(token, ep) sends the packet on its way.

sendBytes(register, bytes) {
 SPI1.write(E.toUint8Array(register | 0x02, bytes), SS);
}

dispatchPacket(token, ep) {
 let nakCount = 0;
 let retryCount = 0;

 const abortTimer = setTimeout( () => {
   console.log('Timeout error');
   return(new Error('Timeout error'));
 }, 5000);

 this.setRegister(REGISTERS.HXFR, token | ep);
 while (this.readRegister(REGISTERS.IRQ) & IRQS.HXFR_DONE === 0) { }

 // clear interrupt
 clearTimeout(abortTimer);
 this.setRegister(REGISTERS.IRQ, IRQS.HXFR_DONE);

 const transferResult = this.readRegister(REGISTERS.HRSL) & 0x0f;

 if (transferResult === HRSL.NAK) {
   console.log('NAK');
   nakCount++;
   if (nakCount > USB_NAK_LIMIT) {
     return(new Error('NAK error'));
   }
 } else if (transferResult === HRSL.TIMEOUT) {
   console.log('Timeout, retrying..');
   retryCount++;
   if (retryCount > USB_RETRY_LIMIT) {
     return(new Error('Timeout error'));
   }
 }
 return transferResult;
}

controlTransferIn(setup, length) {
 const addr = 0;

 this.setRegister(REGISTERS.PERADDR, addr);

 let setupPacket = new Uint8Array(8);
 setupPacket[0] = REQUEST_TYPE[setup.requestType];
 setupPacket[1] = setup.request;
 storeShort(setup.value, setupPacket, 2);
 storeShort(setup.index, setupPacket, 4);
 setupPacket[6] = length;
 console.log('Setup packet:', bytes2hex(setupPacket));

 this.sendBytes(REGISTERS.SUDFIFO, setupPacket);
 let err = this.dispatchPacket(TOKENS.SETUP, 0);
 if (err) {
   console.log('Setup packet error:', err);
 }
}

Now that we have the control transfer set up and sent to the device, we need to transfer the data bytes in. This is done in the transferIn(ep, length) function. We first set the receive toggle , which is used for USB signaling. We then dispatch the IN packet to indicate that we want to read the data bytes. We then check that the data is available by checking the IRQ register for IRQS.RECEIVED_DATA_AVAILABLE. We then ready the packet size from the RCVBC register, and finally read the data bytes themselves from the RCVFIFO register. We clear the interrupt and continue reading until all the data bytes are read

transferIn(ep, length) {
  let transferLength = 0;
  let data = new Uint8Array(length);

  this.setRegister(REGISTERS.HCTL, receiveToggle);
  while (1) {
    const err = this.dispatchPacket(TOKENS.IN, ep);
    if (err) {
      console.log('Error:', err);
      return(err);
    }
    if (this.readRegister(REGISTERS.IRQ) & IRQS.RECEIVED_DATA_AVAILABLE === 0) {
      return(new Error('Receive error'));
    }
    const packetSize = this.readRegister(REGISTERS.RCVBC);
    console.log('Packet size:', packetSize);
    data.set(this.readBytes(REGISTERS.RCVFIFO, packetSize), transferLength);
    this.setRegister(REGISTERS.IRQ, IRQS.RECEIVED_DATA_AVAILABLE); // clear interrupt
    transferLength += packetSize;

    if ((packetSize < 8) || (transferLength >= length)) {
      return { data: data };
    }
  }
}

OK, now that we have defined all the functions we'll need, we can specify the setup packet to get the device descriptor and perform our control transfer:

const getDeviceDescriptor = {
    requestType: 'vendor',
    recipient: 'device',
    request: 0x06, // USB_REQUEST_GET_DESCRIPTOR
    value: 0x0100, // USB_DESCRIPTOR_DEVICE = 0x01
    index: 0x0000
};

usb.controlTransferIn(getDeviceDescriptor, 18);
let results = usb.transferIn(0, 18);
console.log('Get device descriptor:', results.data);

Note that we already know that the device descriptor is 18 bytes long. The configuration descriptor can be of variable length, so we start with reading the first four bytes, which contain the length, and then do another control transfer to retrieve all the data bytes:

const getConfigDescriptor = {
  requestType: 'vendor',
  recipient: 'device',
  request: 0x06, // USB_REQUEST_GET_DESCRIPTOR
  value: 0x0202, // USB_DESCRIPTOR_CONFIGURATION = 0x02, conf = 0x02
  index: 0x0000
};

// Get config descriptor length
usb.controlTransferIn(getConfigDescriptor, 4);
results = usb.transferIn(0, 4);
const configDescriptorLength = extractShort(results.data, 2);
console.log('Config descriptor length:', configDescriptorLength);

usb.controlTransferIn(getConfigDescriptor, configDescriptorLength);
results = usb.transferIn(0, configDescriptorLength);
console.log('Data:', results.data);

Wow, that was quite a bit of code! Well, at least we will be able to re-use quite a few of the functions when we need to perform the other USB transfers. If you'd like to read more about USB, I can definitely recommend Jan Axelson's book USB Complete.

#Electronics #Tidepool